The Global Language of Business
Contact ushvidt omrids af cirkel med hvid pil i midten der peger mod venstre
Data Sharing to Retail in GS1Trade Packaging A-Z

This guide applies to companies that only use GS1Trade Packaging, and companies that use both GS1Trade Packaging and GS1Trade Sync.

The process you need to follow consists of two key steps:

  • First, creating and preparing products and packaging master data
  • Next, sharing packaging data with GS1Trade Sync and retailers.

Video Guide for Data Sharing in GS1Trade Packaging

Se how to create and share packaging data. Timestamps are provided in the guide below, so you can always find the content most relevant to you.

Create Products and Packaging Master Data [0:30-0:40]

When you log in to GS1Trade Packaging, you'll land on the dashboard page, where you get an overview of the products, packaging units, and components created in the system.

Note: in GS1Trade In Packaging, we manage products and packaging separately. This ensures flexibility and simplifies data maintenance. For instance, if the same packaging is used for multiple products, the packaging data only needs to be maintained in one central location.

Create Product [0:40-1:53]

First, we create a product – for example, the trade item launched on the market.

In this example, we are creating a jam product.

  1. Start by going to the tab Products
  2. Click Create new in the upper left corner and select Manual creation
  3. We fill in the following information for our item:
    • Brand
    • Product description
    • Product ID
    • Net content
    • GTIN (required if data is to be shared for the product)
  4. Click Save - and then the product is created.

As you can see, there are no fields on the product page itself that relate to the packaging. The fields here exclusively concern the identification of the product itself.

Create Packaging Components [1:53-3:36]

Now we need to create the packaging that the item consists of. We must create all the individual packaging components that make up the entire product's packaging.

In our jam product example, the packaging consists of three components, each created separately:

  • A lid
  • A label
  • A glass jar
  1. Go to the tab Packaging Master Data.
  2. Click Create new in the upper left corner
  3. Select Create new component.

We start by creating the lid for the jam product.

Be sure to give components recognizable names. Consider establishing a system before you begin, which will make it easier to search the system later, especially if many components and units have been created.

When creating a component, you need to specify:

  • Element type
  • Material type
  • Weight
  • And whether it is a mono-material or composite material
  • The type of material the component is made of

Once these fields are specified, click Save in the upper right corner.

Next, we create the jar, The element type is specified as jar

  • The material type as glass
  • The weight of the jar is entered.


Next, we create the jar, where the component type is specified as jar, the material type as glass, and the weight of the jar is entered.


Finally, we create the third component, namely the product's label.

Creating our label highlights another system feature - whether a packaging component is composed of:

  • A mono-material
  • A composite material, consisting of multiple material layers.


In this example, the label is made of a composite material comprising paper with an LDPE plastic coating.

We specify that it is a composite material and describe the various composite material layers:

  • Material type
  • Material weight
  • Weight unit
  • Material layer function

Main Components and Integrated Components [3:36-4:45]

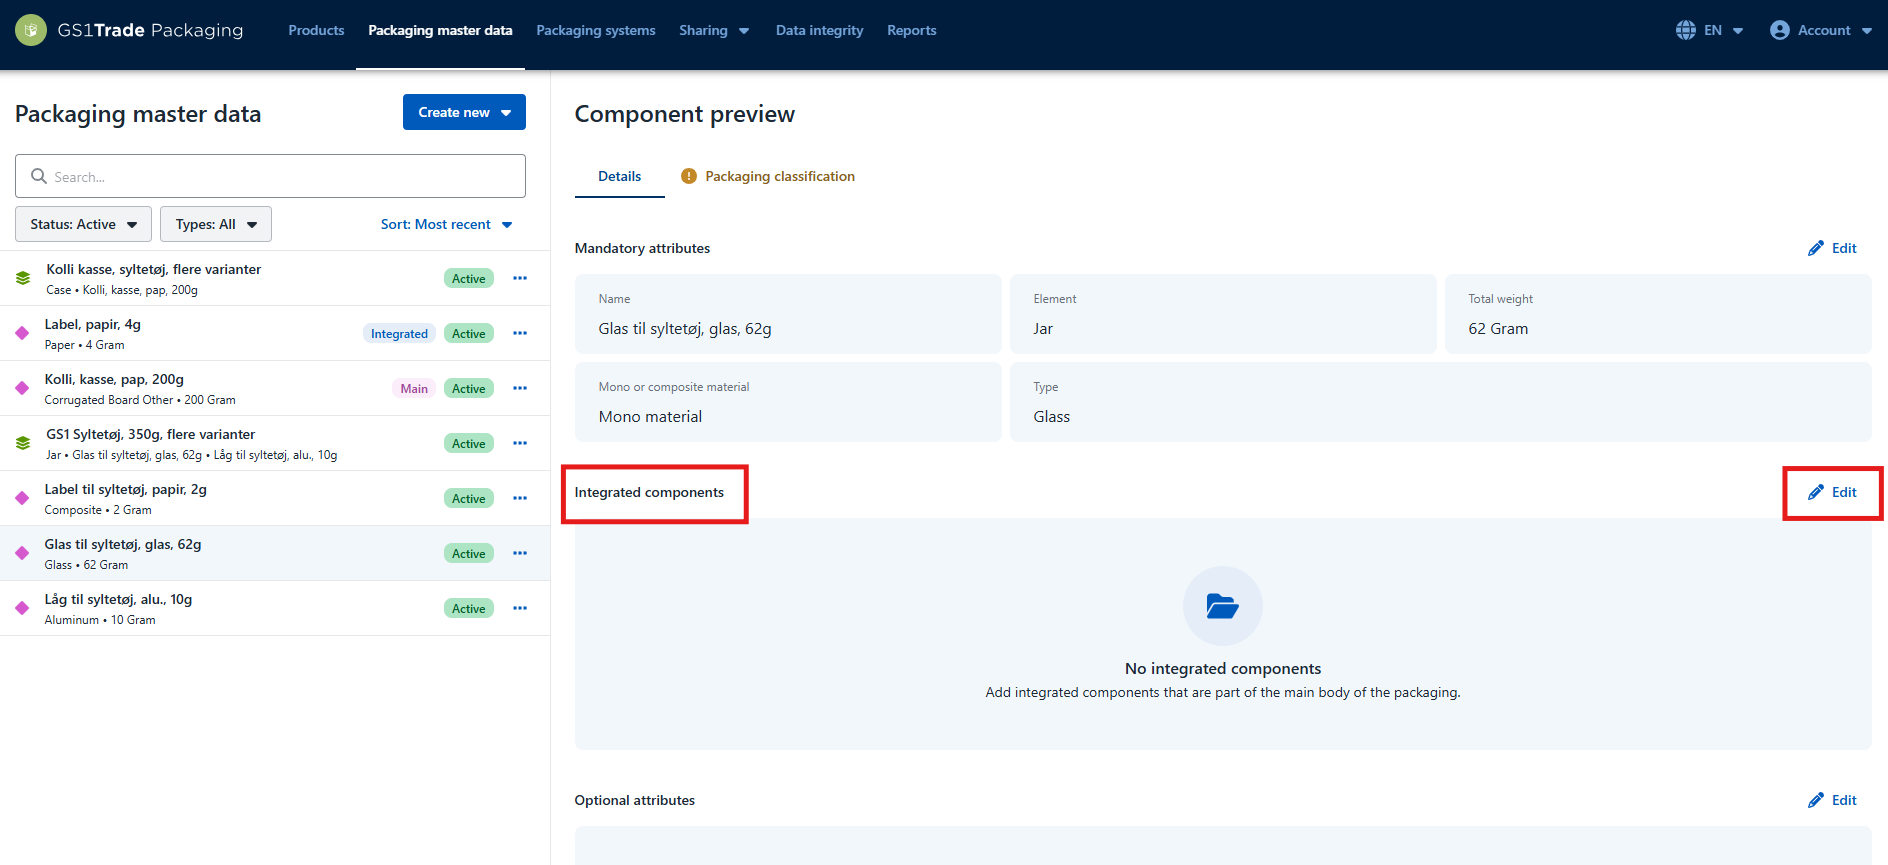
Packaging consists of a main component and potentially integrated and separate components.

The main component is typically the component that constitutes the majority of the packaging by weight or volume.

Once the individual components have been created, it is important to connect them correctly.

They must be connected before packaging units are assembled and before environmental grading is carried out. Packaging with integrated components must be environmentally graded as a whole.

In our example, the jam jar is the main component.

The label must be registered as an integrated component on the jam jar, as it cannot be separated from the jar when discarded.

The lid, however, should not be integrated, as it is a separate component because it can demonstrably be separated from the jar and disposed of separately. This will later be assigned its own environmental rating.

  1. On the main component, the jam jar, go to the tab Integrated Components and select Edit details
  2. Select the relevant component from the list on the right and drag it into the field on the left
  3. In the field Composition we indicate how the integrated component is attached to the main component
  4. Click Save

The jam jar and the label are now correctly integrated into the system and are ready to be environmentally rated.

Recyclability Grading the Packaging [4:45-6:30]

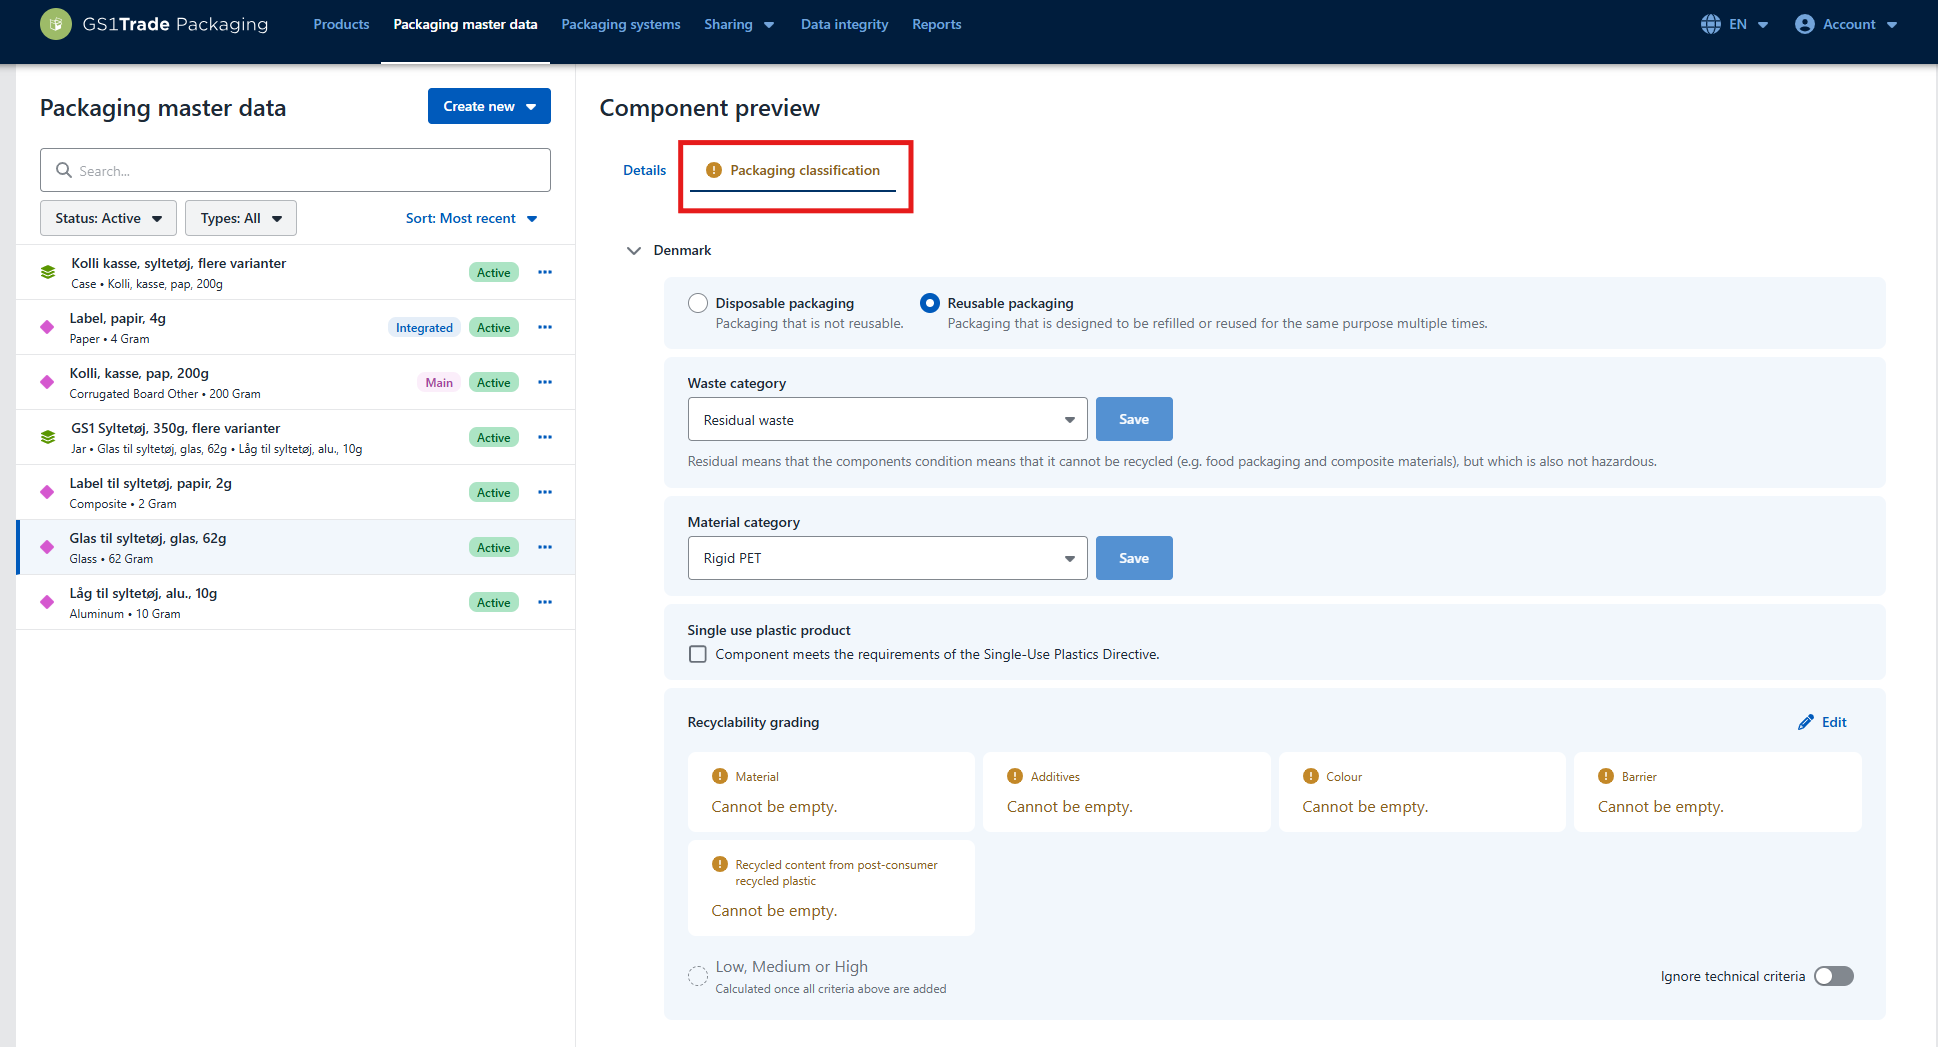
In GS1Trade Packaging, you can environmentally grade your packaging.

It is also a requirement that this is done before you attempt to share data on products that must contain these components.

Environmental grading is performed on the individual components under the tab Packaging classification.

Integrated components do not need to be environmentally graded, as they are linked to the main component and are environmentally graded through it.

We start with the main component - the jam jar.

For environmental classification, the following must be specified:

  • Single-use packaging or Reusable packaging
  • Waste type (General - Residual - Hazardous waste)
  • Material category - this determines the design criteria that need to be completed and addressed

The criteria are based on the Danish Environmental Protection Agency's design requirements.

Each criterion is assessed according to the levels:

  • Low (Green)
  • Medium (Yellow)
  • High (Red)

Note. If you do not have the necessary information about the material, you must contact the packaging manufacturer.

  • Once all criteria are filled in, the information is saved, and the system calculates the component's overall environmental level.
  • It is also possible to select ignore design criteria, which will automatically set the environmental rating to high, without having to consider the various design criteria.
  • The process is repeated for all main components and separate components in the packaging.

Create Packaging Unit [6:30-7:36]

Once all individual components have been created and environmentally rated, they must be assembled into a packaging unit.

  1. Go to the tab Packaging Master Data
  2. Click on Create new and select Create new unit
  3. Give the unit a meaningful name that represents or is associated with it
  4. Specify the unit type, which categorizes the unit's overall function, e.g., bag, box, or case
  5. Click Save.
  6. The packaging unit must now be assembled from the previously created components
  7. Drag components from the right side of the screen into the unit under Components
  8. Remember to specify the quantity of each component used to build a packaging unit

Note. Please note that if data is to be shared with retail, the packaging unit and its components should only represent a single instance of the GTIN without content. For example, for a case unit, this means that only the packaging for one empty case should be included.

Link Packaging to Product [7:36-8:30]

Once both the product and packaging are created in the system, they must be linked to the packaging unit that is unique to each GTIN.

  • Base Unit with Base Packaging
  • Case with Case Packaging
  • Pallet with Pallet Packaging

  1. Select the given packaging unit and go to the tab Linked Products
  2. Click Link to Product and search for and select the GTIN
  3. In this example, the jam jar is linked to the primary packaging unit
  4. The case is assigned to the secondary level, and any pallet with a GTIN is assigned to the tertiary level.

By using the same packaging unit across multiple products, data only needs to be updated in one place if changes occur. This saves time and ensures more efficient data maintenance.

For example, this unit could be used for several jam varieties such as strawberry, raspberry, and orange.

Create Packaging System [8:30-9:49]

Once all packaging units have been created, we need to assemble them into a system if, for example, we want to show the connection between base units and case units.

In our example, we sell the jam product in cases, so we need to create a packaging system for the product hierarchy.

Packaging systems reflect the product hierarchy and the number of units included in the system, i.e., the quantities products are packed in when they leave the warehouse.

If you only work with base units and primary packaging, packaging systems may not be relevant for you.

  1. Go to the tab Packaging Systems and select Create new
  2. Name the packaging system so you know which products it relates to, and optionally give it an internal ID if that makes it easier for you to keep track.
  3. Click Save in the right corner.

On the right side, the created packaging units are now displayed, which can be used to build the system.

Packaging units can be dragged into the levels:

  • Primary packaging
  • Secondary packaging
  • Tertiary packaging

Enter the total number of each packaging unit in the system. Systems are always defined starting from the highest unit.

In this example, the system consists of: 1 carton containing 24 base units.

If a system has 1 pallet with 8 cartons, and each carton contains 10 base units, there will be a total of 80 base units on the pallet.

This should be entered as:

Primary: 80

Secondary: 8

Tertiary: 1


Share Packaging Data [9:49-14:00]

Once products and packaging data have been fully created in GS1Trade Packaging, we are ready to share data with retailers.

Before publishing product data, you should ensure that:

  1. All packaging components have been created, optionally integrated, and all components have been environmentally graded
  2. Units have been created and linked to the products
  3. Any packaging systems have been created
  4. The product has a GTIN


Share Data in GS1Trade Packaging when you DO NOT have GS1Trade Sync [10:14-11:22]

  1. Go to the Products tab and select the product to be shared
  2. Under Sharing settings for the product, you must specify the data recipient(s)
    • By default, data is shared to both GS1Trade Sync and GS1Trade Packaging - if it should only be one, this must be specified
    • If you need to share with a retail customer, both must be enabled
  3. Go to the Sharing tab, where you will see a list of all products ready for sharing
  4. Select one or more products that you wish to publish with a checkmark
  5. Click Publish
  6. Under the tab Publications (under Sharing) you can track the status of your publications. When the status shows “Publication completed”, the data has been published.

If the status is "Approval required", it means that the GTIN you are trying to share shares packaging units with another product. In this case, the system will require you to update data for all products that share this unit, to ensure that no misaligned data is sent to the data recipient. An approval must be actively performed, otherwise the publishing process will not continue.


Share Data when you use both GS1Trade Packaging and GS1Trade Sync [11:23-14:00]

Firstly, when data is published from GS1Trade Packaging:

  • Products that already exist and are published in GS1Trade Sync system will automatically be shared with the same data recipients configured in GS1Trade Sync.
  • Products that do not exist in GS1Trade Sync, however, will be created as drafts, which subsequently needs to be published in GS1Trade Sync to their respective data recipient or as public.

If your company uses both GS1Trade Packaging and GS1Trade Sync - and your data recipient has not specifically requested access to data directly via the GS1Trade Packaging interface - you should not add recipients in GS1Trade Packaging.

Instead, you should:

  1. Go to the Sharing
  2. tab. Select one or more products with a checkmark - those you wish to publish.
  3. Click Publish

When you publish the product, data is sent to GS1Trade Sync.

After this, the publication must be completed in GS1Trade Sync, where you specify data recipients and complete the final publication.

Note. If your data recipient wishes to receive data directly in GS1Trade Packaging, then you must specify the data recipient under "Sharing settings" on the product before publishing.


After publishing in GS1Trade Packaging, the rest of the process continues in GS1Trade Sync, where we must ensure that data has been shared with the desired retailer.

  1. Log in to GS1Trade Sync
  2. Go to the tab Product Overview
  3. Select Advanced Search on the right side - click Add/remove search filters and add Sector - select the filter EPR
  4. Click Search

All products (GTINs) shared from GS1 will then be displayedTrade Packaging.

If the product is Live or Published data is shared with the specified data recipients, who also receive product data for the product in GS1Trade Sync.

If the product is in a Draft, you need to do the following to share it:

  1. Click on the product's GTIN to open the product
  2. Go to the Basic Information tab on the left side and select Publication Overview
  3. Should the product be available to all? Click Publish in the bottom right corner
  4. Should the product be shared limited to a specific data recipient, so only they can receive data for the product? Click on Who should have access to data? - select Limited and Data Recipients
  5. Then search for the customer's GLN or name and select them
  6. Click Save, and then Publish.

The packaging data has now been shared with the desired retailer.

Do you want to download the guide?

arrow-right-circle
Hent den her

Do you still need help? Reach out to our support team. We are always ready to help.

Har du spørgsmål?
Contact us here

Data Sharing to Retail in GS1Trade Packaging A-Z

Newest guides

GS1 Trade Packaging ikon - grøn cirkel med  illustration af en åben papkasse
Trade Sync ikon - en lyserød cirkel med en illustration af tre cirkler ovenpå hinanden i en cylinder
Exact ikon - en solgul cirkel med en illustration af et forstørrelsesglas
Image ikon - en lyselilla cirkel med en illustration af et kamera i midten
Transact ikon - en lyseblå cirkel med en illustration af et stykke papir med tekst og en stjerne på
GLN ikon - en orange cirkel med en illustration af et lokationssymbol
Logo til Activate service grøn cirkel med grafik af papir med tekst og check-mærker
GTIN ikon - en grøn cirkel med en illustration af fem lodrette streger som en stregkode
|
Videokamera ikon i en mørkeblå cirkel
Ikon for læsetid - en mørkeblå cirkel med fire horisontale streger der indikerer tekst
 min
Data Sharing to Retail in GS1Trade Packaging A-Z
Learn how to create packaging data in GS1Trade Packaging and share it with retailers. We'll cover the entire process, from creating packaging components to publishing data.
This is some text inside of a div block.
GS1 Trade Packaging ikon - grøn cirkel med  illustration af en åben papkasse
Trade Sync ikon - en lyserød cirkel med en illustration af tre cirkler ovenpå hinanden i en cylinder
Exact ikon - en solgul cirkel med en illustration af et forstørrelsesglas
Image ikon - en lyselilla cirkel med en illustration af et kamera i midten
Transact ikon - en lyseblå cirkel med en illustration af et stykke papir med tekst og en stjerne på
GLN ikon - en orange cirkel med en illustration af et lokationssymbol
Logo til Activate service grøn cirkel med grafik af papir med tekst og check-mærker
GTIN ikon - en grøn cirkel med en illustration af fem lodrette streger som en stregkode
|
Videokamera ikon i en mørkeblå cirkel
Ikon for læsetid - en mørkeblå cirkel med fire horisontale streger der indikerer tekst
 min
Create Packaging systems in GS1Trade Packaging
Learn how to create packaging systems and create a better structure for your data in GS1Trade Packaging.
This is some text inside of a div block.
GS1 Trade Packaging ikon - grøn cirkel med  illustration af en åben papkasse
Trade Sync ikon - en lyserød cirkel med en illustration af tre cirkler ovenpå hinanden i en cylinder
Exact ikon - en solgul cirkel med en illustration af et forstørrelsesglas
Image ikon - en lyselilla cirkel med en illustration af et kamera i midten
Transact ikon - en lyseblå cirkel med en illustration af et stykke papir med tekst og en stjerne på
GLN ikon - en orange cirkel med en illustration af et lokationssymbol
Logo til Activate service grøn cirkel med grafik af papir med tekst og check-mærker
GTIN ikon - en grøn cirkel med en illustration af fem lodrette streger som en stregkode
|
Videokamera ikon i en mørkeblå cirkel
Ikon for læsetid - en mørkeblå cirkel med fire horisontale streger der indikerer tekst
 min
Placement of the QR-code with GS1 Digital Link
Correct positioning of the QR code is critical to ensuring efficient scanning at both the point of sale and by consumers
This is some text inside of a div block.